
Create Virtual environment (VENV) For Python Project with PowerShell

Computer Science/Mathematics Analyst, B.Eng. - Petroleum Engineer and a Python Developer. Guess what! I love writing, it's a hobby. Helping to make you a better person is my desired legacy.
VENV is an integrated python virtual environment tool built into python to allow the use of separate different working environments for your python projects. In a case where you have multiple projects and they all rely on a different framework, maybe Flask or Django. Each one of these projects may be using a different version of Django or Flask as the case may be. For instance, you did a project with Django 1.0, then whenever you update your Django to a higher version available it will break down a couple of commands in the project when you want to run the project with the updated Django package. But what a virtual environment does is that it allows you to create a designated or isolated environment for your project, and inside that environment, the needed framework version, modules, and libraries will be installed and a relationship will be created within them. On a general note, when any software is installed into the computer, it is located in the windows program folder for access to every command that pertains to it. But packages installed in the virtual environment stay in the virtual environment and are executable within the environment once the virtual environment is activated. Based on your needs, you can create as many virtual environments as required. Virtual environment (venv) allows you to make use of different python package as the project requires, without interference with the required design environment for other projects.
The three forms of Virtual Environments that can be used for python projects include;
- PIPENV
- VENV
- VIRTUALENV
This tutorial will show you how to create a virtual environment (venv) and activate it.
Step 1: launch windows PowerShell
PowerShell is a windows component built on top of >NET CLR (Common Language Runtime). PowerShell consists of a command-line shell and scripting language. In place of Command prompt (CMD), PowerShell can be used. This tutorial is for Windows users. You can easily access windows PowerShell by typing PowerShell into the windows search bar on the taskbar:
Step 2: Verify If Python is installed
When PowerShell opens up a prompt for input, type python and hit the enter button to run If Python is installed on your PC and added to PATH, the command will be recognized and PowerShell will display information about the python version install with some command list as shown below:

Install latest version of python from here
Step 3: Check if you have pip installed on your PC.
PIP -Preferred installer program, is a tool used to install and manage python packages such as frameworks and libraries. In this tutorial, we are going to be running all our command lines using Window PowerShell, an alternative to using Command prompt (CMD.exe).
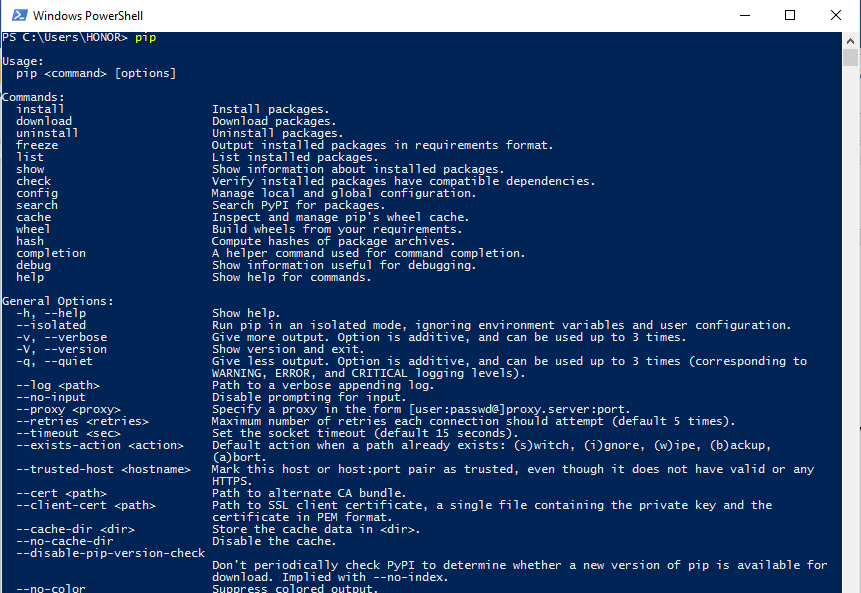
In the PowerShell interface, type pip help and hit enter to run
If you have pip installed, you should see something like what is shown in the image below;
But in a case where pip is not installed, PowerShell would not respond to the command because it is not a recognizable command that relates to any package currently present on the PC. An error message will be displayed. Note: pip is automatically installed with python 3.4 and above unless otherwise deselected by the user during python installation using the custom installation option.
Check out how to install pip here
Step 4: Create a directory (folder) for your project
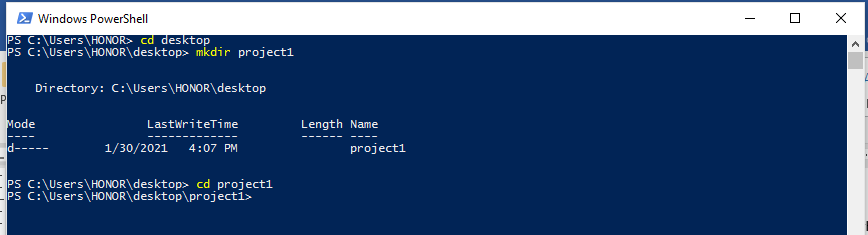
Type cd desktop in the PowerShell and press enter, then type mkdir project1 after which you run cd project1. The first command line will take you to the desktop directory, while the second command line will create a folder named project1 on the desktop for the intended project, the third command line will open up the project1 folder so that everything done afterward is within the project1 folder. The virtual environment will be created and activated inside the Project folder created which in this case is project1.
Step 5: install venv with pip by entering the command below;
pip install venv
Step 6: Creating a Virtual environment (venv)
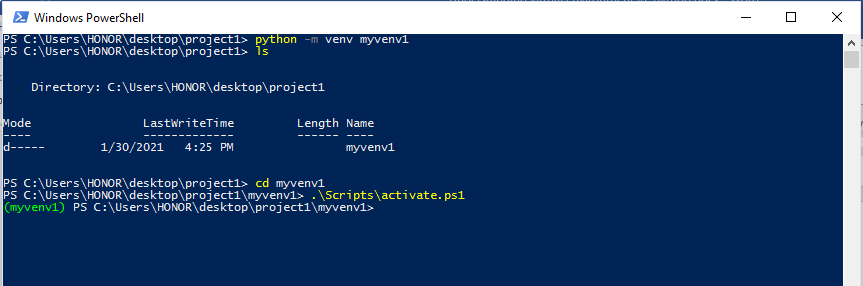
Run python –m venv myenv1 to create the virtual environment. This Command line will create a folder name myenv1 inside project1, myenv1 folder created will contain all necessary components for initiating a virtual environment, in this case, myenv1 is the virtual environment component folder name, you can choose to use any name you deem fit.
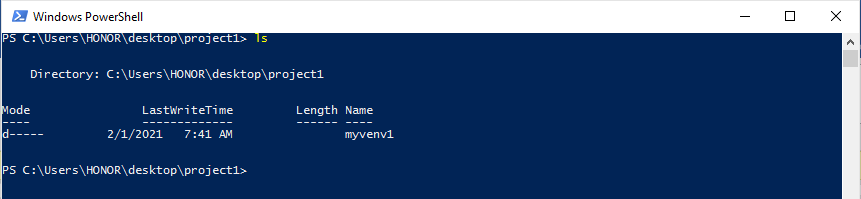
Step 7: Checklist of files inside project1 by running ls command. Your display should look like the figure below;
Step 8: Activate the virtual Environment (venv)
First, enter into the myenv1 folder/directory using cd myenv1 , then run .\Scripts\activate.ps1 to activate the virtual environment.
Step 9: Install the required packages needed for your project.
Let’s install some python library with the following commands;
pip install requests

pip install pytz

pip install Django==2.0
All these packages should get install and be located inside project1/myenv1/lib/site-packages. You will be able to find them in this location.
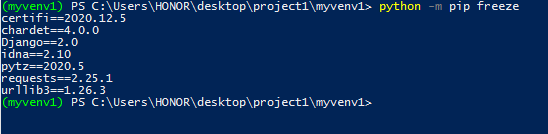
Step 10: Get a list of the packages installed
It is easier to keep track of the packages installed for any particular project done in a virtual environment. To view all the command, enter the command below;
python -m pip freeze
To create a text file that has all the installed requirement/dependencies stored into it, run the command below;
pip freeze > requirements.txt
The command above creates a text file name requirements.txt’ with all the packages installed for the project saved in it. The requirement.txt will be located in myvenv1 folder inside project1. The file will be very useful when deploying your project on other platforms. It provides you all the project dependencies/packages at your fingertip. So it easier to know what and which dependencies to be installed for the project to work without a breakdown of any part of the code on any other platform even on the production server.
To install all the project dependencies and packages using the requirement.txt file, just run the command line as shown below;
pip install -r requirements.txt
Conclusion
Virtual environment (venv) is a very important tool required in working on a project that is based on the python programming language. understanding this concept will enable you to run multiple python dependent projects with different frameworks, libraries, or modules as required, without interference with each other.
Hope this article helps you. Please share it with friends and colleagues and if you have any questions or feedback, please drop a comment. Place a like too.


